Introduction:
Custom views or filter allow you to define custom criteria for what you want to see in the email list, and easily switch between them. Given below is an example that demonstrate the use of filters.
Example: Create a Filter to only show emails with 'Follow Up Flags'
This filter, when applied, will only show those emails that have follow-up flag set on them (and is not already complete).
Step 1: Open the Filter Dialog:
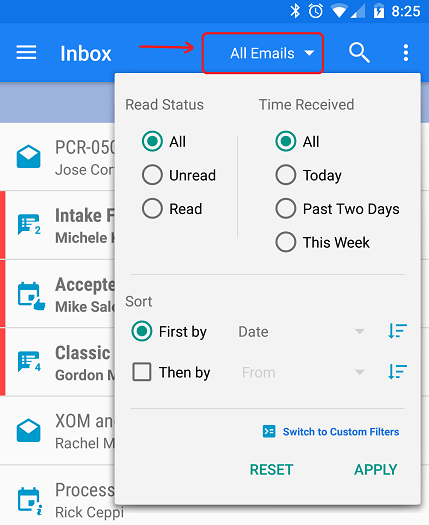
When you are viewing the emails, the current filter shows at the top of the navigation bar (as circled in the screenshot below). If you haven't already created or set a filter, you will see a label called 'All Emails', which is the default filter and shows all emails. Click on its name to bring up the filter selection dialog. Screenshot below:
Step 2: Click on Create New Filter:
As you see in the screenshot above, the default view has some options to quickly filter emails, such as Read/Unread Status, or received date. If you want to do any more customization, as we want to in this click, you should click on 'Switch on Custom Filters' to go to custom filter menu. When you click on this link for the very first time, you will see a list of filter with only one filter in it, called, 'All Emails' which is the application default. The screenshot below highlights the option to create a new filter:

Step 3: Specify Filter Criteria
Once you are on the New Filter screen, the first thing you will want to do is to set a name for this filter. In this example, we will set our filter name to 'Follow Ups' as this filter is meant to show the emails that have flags set on them. This is shown in the screenshot below:

After setting the name, you can set any of the filter options. You will need to scroll down a bit to go to the 'Follow Up' filter option. Once you see it, check the box to indicate that you do want this value to be used in the filter, and select an appropriate option from the drop box. In this case, we are looking for emails with open flag set on them, so we'll set the follow up filter value to be 'Oustanding'. If you were looking for all emails that have follow up flags on them, even if they have been already marked complete, then you should pick the value 'Completed or Outstanding'. This is shown in the screenshot below.

After you have set these values, you can click on the save button to save this custom filter.
Step 4: Apply the Custom Filter:
Once you have saved the filter, it will appear in the custom filter list, and you can easily select it from the list to apply on the current folder you are viewing. MailCal remembers the filter you applied and will keep it on until you switch to another, or default filter. This way you can create as many filters as you want, and easily switch between them.
